Following my earlier posts covering an introduction to the notes on the guitar fretboard and some basic music theory, in this post I’ll provide some visualization tools to help provide some insight into the structure and layout of the notes on the guitar fretboard.
As mentioned earlier, learning the notes across the fretboard can be a bit challenging because there are six strings, and the same notes appear in different places on each string.
In some ways, keyboard players have an easier time: the pattern of keys on a keyboard repeats every octave, and it maps directly on to natural and non-natural notes. This makes it somewhat easier for a beginner keyboardist to recognize the notes across the instrument.
Many years before I started learning guitar, I played the piano, and because of this background I wanted to see if it’s possible to show the notes on the guitar fretboard in such a way that they “jump out” visually, somewhat like a piano keyboard.
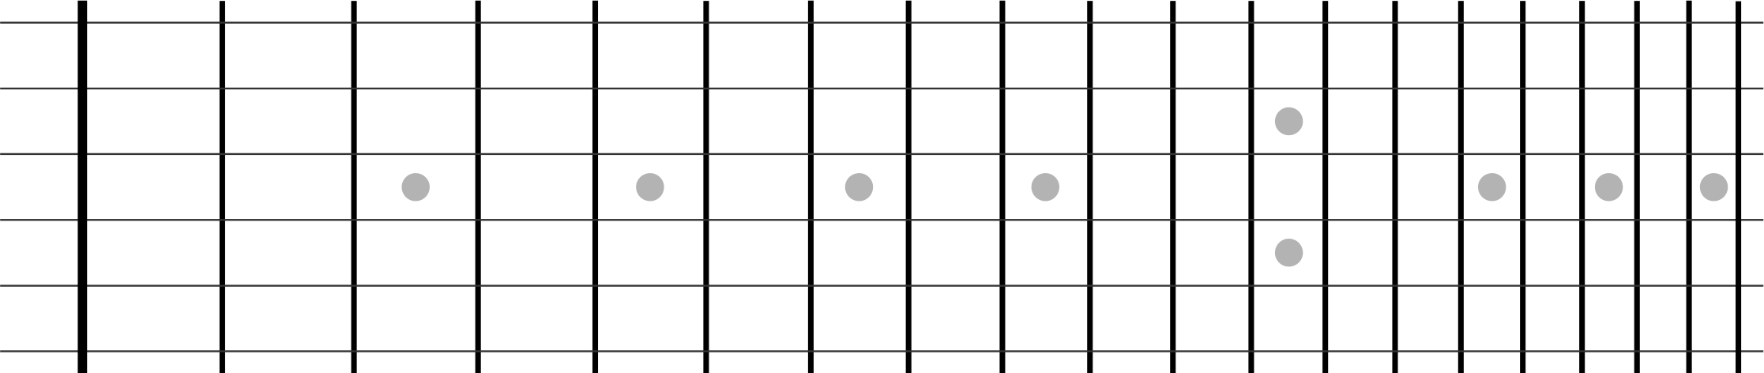
In order to do this, I first tried drawing a fretboard with each string thickened into a stripe, and then making each fret position lighter if it’s natural, or darker if it’s non-natural.
Unfortunately this doesn’t help much: it produces a rather random-looking jumble of light and dark boxes.
CDE and FGAB note ranges
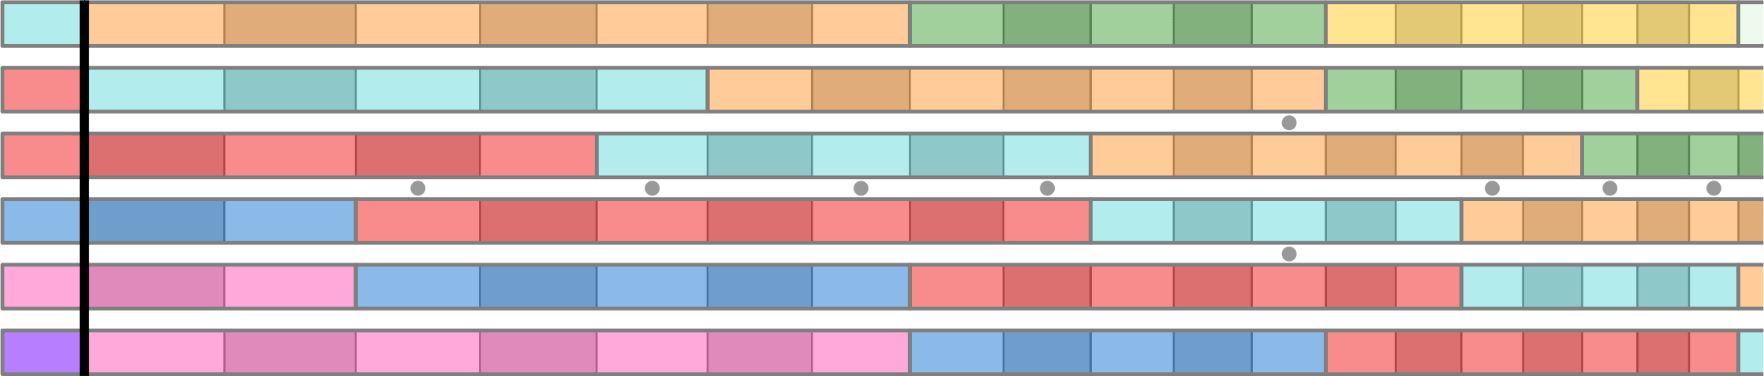
To improve on this, I split each octave into two ranges, CDE and FGAB, and used different colours for these ranges in each octave.
The reason for choosing the ranges CDE and FGAB is that they highlight the underlying pattern of natural notes. Where one range ends and the next begins, the naturals are a semitone apart (i.e. no black note between): the boundaries B-C and E-F. Everywhere else, the naturals are a tone apart (i.e. one black note between).
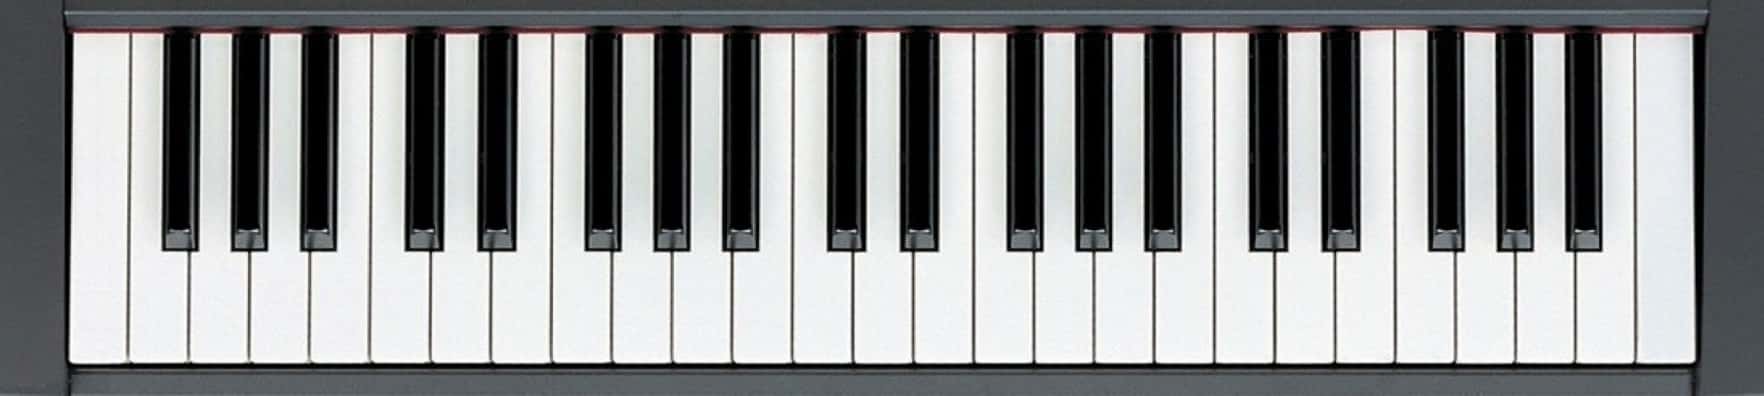
Here are the CDE and FGAB ranges shown on a keyboard image.
For reference, Middle C is marked with a pointer.
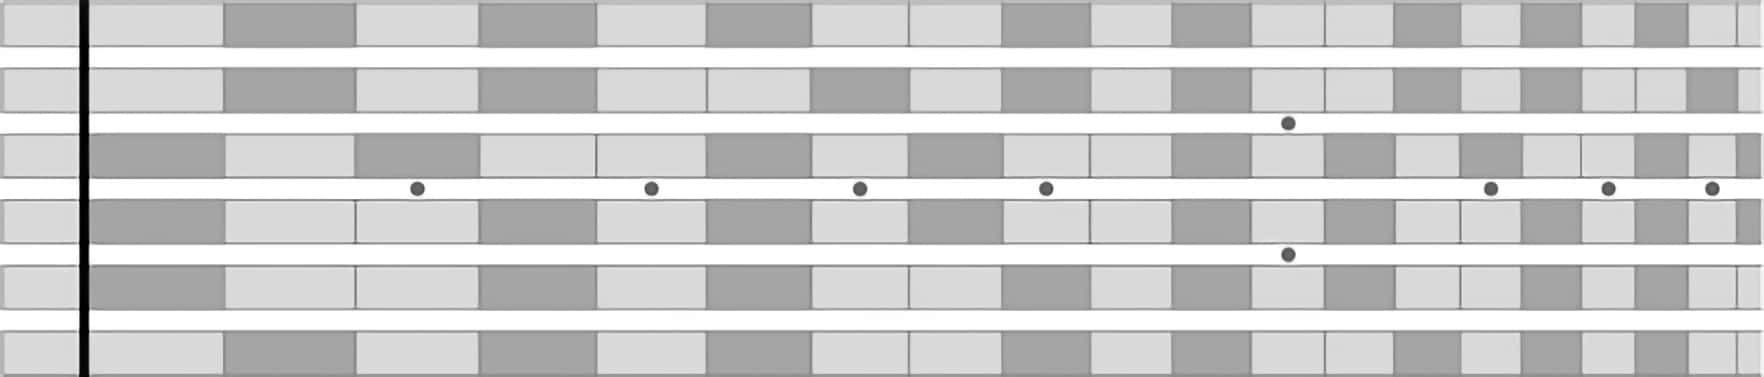
Next, I added the same colours to the guitar fretboard, in addition to lighter and darker fret positions representing naturals and non-naturals. This is what we get.
For printable PDF versions of the fretboard images in this blog post, see the last section below
Now, the pattern of light and dark boxes doesn’t look so random. The notes on the guitar fretboard are revealed in a slightly more visual, perhaps more “piano-like” way.
Furthermore, this gives you a good idea of the overall layout of the notes, and it’s possible to see at-a-glance where the same absolute pitch can be played on different strings. For example, Middle C (c′) is the first lighter-coloured (i.e. natural) fret position within the pale blue range (c′ to e′), which appears on at least four different strings.
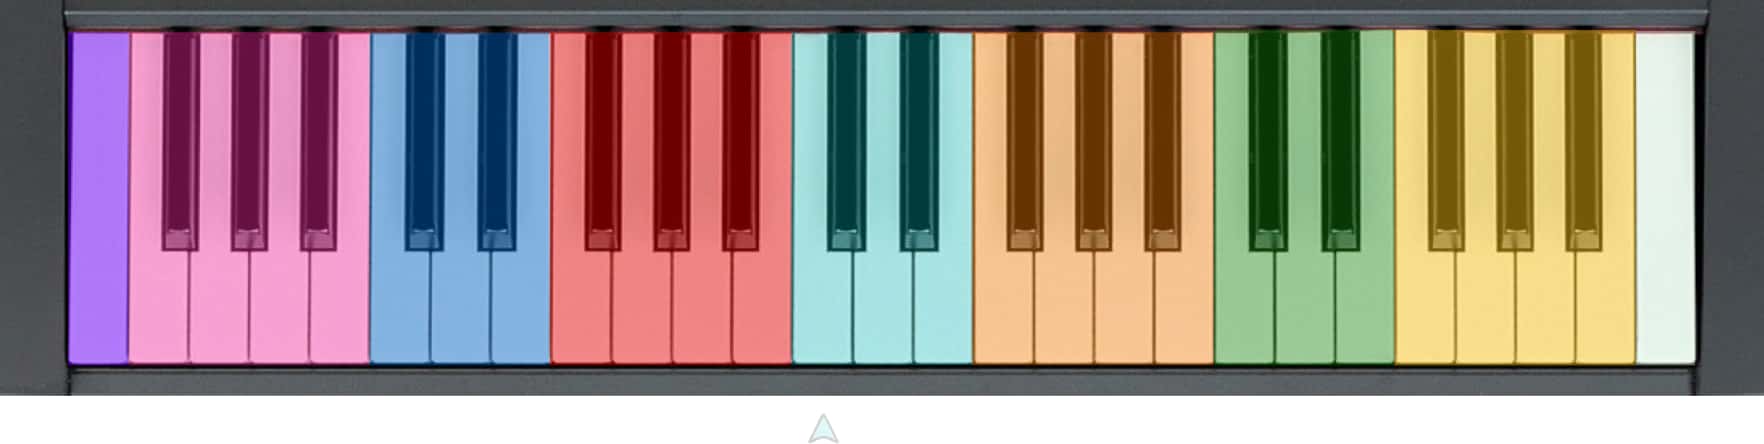
For reference, here are all the note names shown with the coloured CDE and FGAB ranges, with Middle C again indicated by a pointer.

The note names are written using Helmholtz pitch notation. This strip only shows natural notes, so the note names correspond only to the lighter-coloured fret positions in the fretboard image above. Again this is due to the way the natural and non-natural notes are distributed. If we lay out the same natural note names across the fretboard it looks like this.
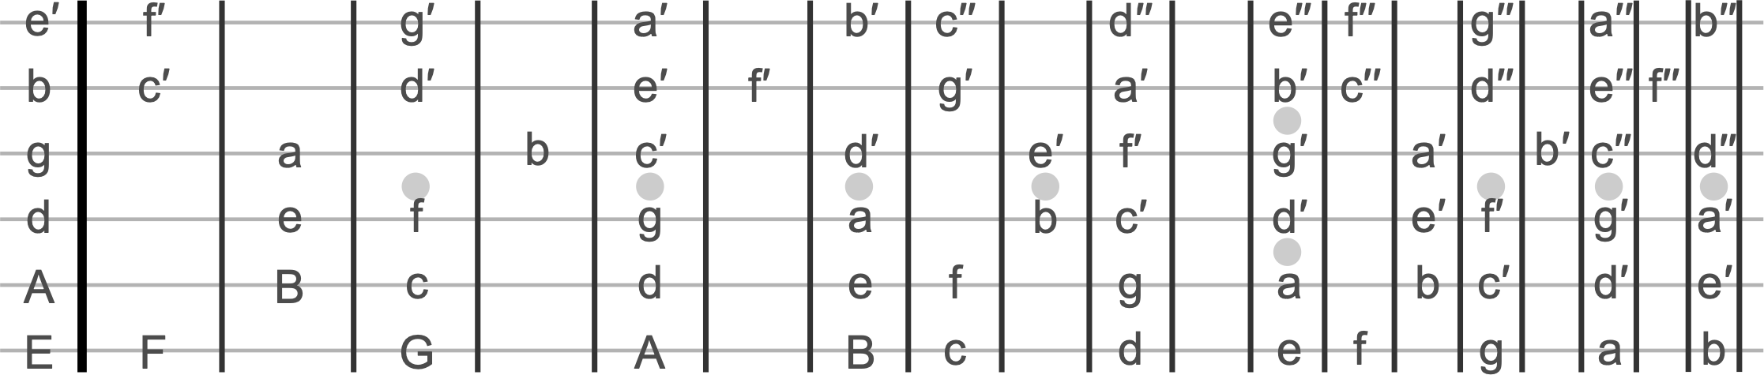
Notation
Now let’s use the same coloured note ranges to understand musical notation for guitar. In the following diagram I’ve added the same coloured note ranges to show how the notes map on to the guitar fretboard.

The symbol at the beginning is the clef which tells you how to interpret the pitch of the notes. Guitar music uses the treble clef.
In the absence of a key signature after the clef, the notes written are all naturals.
What this means is that regardless whether the notes fall on a stave line or between two stave lines, they are all natural notes—so once again they correspond only to lighter-coloured fret positions in the fretboard image above, and the white notes on the keyboard.
In musical notation, non-natural notes must be indicated using ♯ (sharp) or♭ (flat) signs. These can be placed either in a key signature, or as accidentals—but I won’t cover these here.
The guitar as a transposing instrument
While we’re on the subject of musical notation, now is a good time to mention that the guitar is a “transposing instrument”.
A transposing instrument is one in which the absolute pitches of the notes played on the instrument are shifted up or down by a certain amount, compared to how they are written in notation.
In the case of guitar, notes are shifted down by one octave when played, compared to how they are written.
To make this clear, let’s look at how the following written note would be interpreted—first on a non-transposing instrument that also uses the treble clef, and then on the guitar.

- In music written for a non-transposing instrument such as piano, this would mean Middle C (or c′)
- In music written for guitar, this would mean one octave below Middle C (or c)
This distinction only relates to how guitar music is written in notation. Unless you’re dealing with notation, the fact that the guitar is classed as a “transposing instrument” has no relevance. Really, it’s guitar notation that is transposed, not the guitar itself.
What’s really happening is that guitar notation is transposed up one octave when written, which means you need to transpose back down one octave when you read it.
The only purpose behind the guitar being a transposing instrument is so that in guitar notation you avoid lots of ledger lines, which are notes written above or below the stave, while using a familiar clef—the treble clef.
A little “8” sign can be placed under the treble clef to indicate that you must transpose down by one octave. You don’t generally see that in guitar music, but in the notation diagram above I used it to avoid ambiguity.
The absolute pitch played on any instrument can be unambiguously described based on how you would write or describe the same note for a non-transposing instrument. This absolute reference is sometimes called concert pitch—effectively, we’re using concert pitch whenever we use Helmholtz pitch notation as an absolute reference.
The colours in the visualization diagrams
In the visualization diagrams above, I didn’t choose the colours at random. Neighbouring note ranges required contrasting colours, so I started off alternating between blue and red for the CDE and FGAB ranges one octave below middle C. As the note ranges get higher in pitch, the colours shift towards the green corner of the colour gamut, and also become lighter. So there is a kind of pattern to it.
The resulting colours, especially in the PDF renderings below, can be used as a mnemonic to help learn the layout of the notes. You can also use them to break the fretboard down into smaller chunks, to make the process of memorizing the notes a little more manageable.
One good thing about the CDE and FGAB coloured ranges is that, despite breaking the fretboard down into smaller chunks, they maintain clarity of where the same absolute pitches can be played on different strings.
Putting it all together
Studying fretboard charts does not in itself make you remember the notes on the guitar fretboard. That only seems to come through much playing and practising.
What I’ve tried to do in this post is to plot an overall map of the fretboard, to make it possible to “see” it in its entirety.
In order to actually learn the notes on the fretboard, a great tip is to start by learning the notes on the 5th and 6th (A and E) strings only. This is because the most common barre chord shapes have their roots on these strings.
Once you know the main barre chord shapes such as major, minor and dominant seventh rooted on either the 5th or 6th strings, then by combining this with knowing the note positions on these two strings, you can play these chords in any key.
Be sure to learn plenty of songs using these chords in order to learn the notes on the 5th and 6th strings. Some things just stick in your head more easily when there is a musical context.
Once you know the 5th and 6th strings, with minimal additional effort you can also learn the 1st (e′) string as well, since every note on this string is always two octaves higher than the same fret on the 6th (E) string.
When this is done, you know the strings E, A and e′—that’s three, out of a total of six. Congratulations: you’ve covered half the fretboard! Only three more strings to go…
The guitar fretboard visualization chart
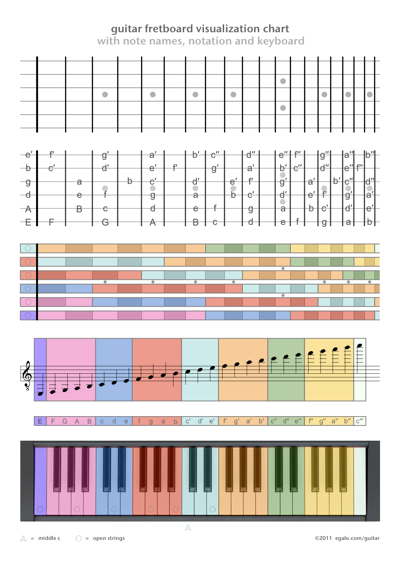
The guitar fretboard visualization chart provides a selection of images from these blog posts on one free single-sided PDF sheet. It can be used as a quick reference, helper and learning aid. There is also a version of the visualization chart using scientific pitch notation instead of Helmholtz notation.
There are various other PDF charts including blank tab and blank fretboard charts, which have a clean, simple design optimized for printing out and writing on, and alternative versions of the fretboard charts, including left-handed versions.
Enjoy!